You can download hundreds of free Halloween crochet patterns right now from designer blogs, craft platforms like Ravelry and Yarnspirations, and community sites, then complete most projects in a weekend with basic stitches and inexpensive yarn. Whether you’re looking for adorable amigurumi pumpkins, spooky ghost garlands, or cozy seasonal blankets, free patterns give you instant access to creative projects without spending a dime on instructions.
The best part? Most Halloween crochet designs rely on simple techniques you probably already know. Single crochet, double crochet, and basic increases are enough to create impressive decorations, wearable accessories, and charming gifts. Even if you’re newer to the craft, these patterns typically include stitch counts, photos, and beginner-friendly guidance that walk you through every round.
Finding quality free patterns takes a bit of strategy. Designer websites often share seasonal releases to showcase their work, while larger platforms curate tested patterns with user reviews and modifications. You’ll want to check a few key sources and read through comments before starting any project. Other crocheters often note yarn weight adjustments, common trouble spots, or helpful shortcuts that save you time and frustration.
This guide shows you exactly where to locate the best free Halloween patterns, what materials work best for different project types, and how to execute each design from start to finish. You’ll learn how to read pattern abbreviations, avoid common mistakes, and add your own creative touches to make each piece uniquely yours.
What You’ll Need: Essential Materials and Tools
Before you dive into those charming free Halloween crochet patterns, let’s gather everything you’ll need to bring your spooky creations to life. Having the right materials on hand saves frustration midproject and ensures your finished pieces look polished.
Yarn Selection and Weight
Most Halloween crochet patterns specify a yarn weight, which directly affects your project’s size and drape. Weight #4 (worsted or medium weight) is the most common choice for Halloween projects because it works up quickly and holds shapes well. For smaller amigurumi characters like tiny ghosts or bats, weight #2 (sport) or #3 (DK/light worsted) creates finer details. Wearables such as shawls or scarves often call for lighter weights like fingering or DK for comfortable drape.
Choose acrylic yarn for durability and easy washing, cotton for structured decorative items that need to hold their shape, or soft plush yarn for cuddly amigurumi. Traditional Halloween colors include orange, black, white, purple, and green, but metallic or variegated yarns add extra flair.
Essential Tools and Supplies
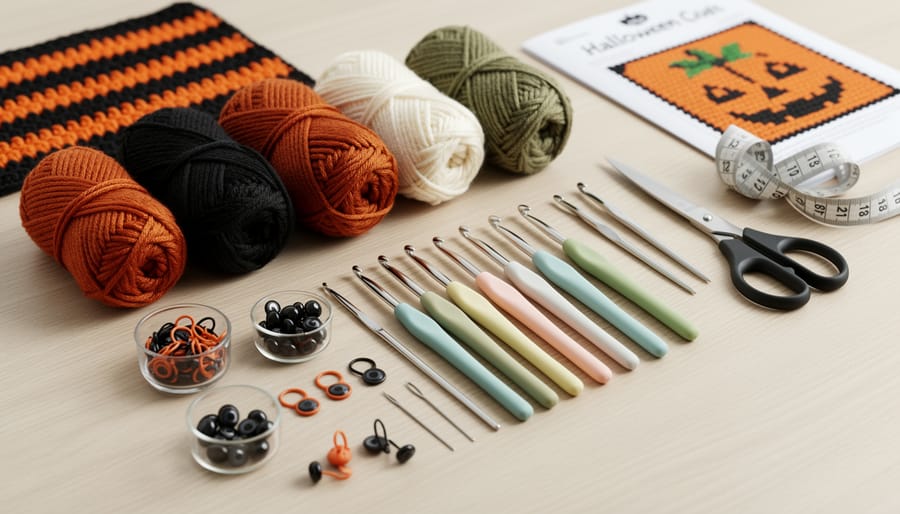
- Crochet hooks in sizes D/3.25mm through J/6.0mm (match the hook size to your yarn weight for proper gauge)
- Polyester fiberfill stuffing for amigurumi and three-dimensional decorations
- Safety eyes in various sizes (typically 6mm-12mm) for creature features, or black yarn if you prefer embroidered alternatives
- Yarn needle with a large eye for weaving in ends and sewing pieces together
- Stitch markers to track rounds and pattern repeats in continuous spiral work
- Sharp scissors for clean yarn cuts
- Measuring tape to verify gauge and finished dimensions
Additional helpful items include wire for poseable limbs in larger figures, felt for accent pieces like pumpkin stems or witch hat brims, and embroidery floss for adding detailed facial expressions. Keep a small notebook handy to jot down any modifications you make to patterns, which helps if you’re creating multiple matching pieces or want to recreate successful projects in future years.
Safety Considerations Before You Begin
Before you dive into crocheting your Halloween decorations, take a moment to consider a few important safety factors that will protect both you and your loved ones. If you’re creating items for homes with young children, be mindful of small parts choking hazards associated with safety eyes, buttons, beads, and small embellishments that could detach. Children under three are particularly at risk, so opt for embroidered or sewn features instead of plastic safety eyes when making decorations that will be within reach of toddlers.
Your own comfort and health matter too. Crochet involves repetitive hand motions that can strain your wrists, fingers, and shoulders over extended periods. Take regular breaks every 20 to 30 minutes to stretch your hands and rotate your wrists, and maintain good posture with proper lighting to reduce neck and eye strain. Choose ergonomically designed hooks with cushioned grips if you plan to work on multiple projects or experience any discomfort.
When it comes to tools and finishing, handle crochet hooks carefully to avoid accidental pokes, especially when working with smaller steel hooks. Keep sharp scissors, tapestry needles, and pins organized and out of reach of children and pets. If you’re gathering easy starter supplies for your first Halloween crochet projects, storing everything in a dedicated container will help prevent accidents and keep your workspace safe and tidy.
Where to Find Quality Free Halloween Crochet Patterns
Finding reliable free Halloween crochet patterns doesn’t require endless scrolling through questionable sites. Start with established pattern repositories like Ravelry, which hosts thousands of user-submitted patterns with detailed project pages, photos, and honest reviews. The platform’s advanced search filters let you sort by difficulty level, yarn weight, and project type, invaluable when you need a quick pumpkin pattern versus an intricate haunted house.
Designer blogs offer another goldmine. Many independent crochet designers share seasonal freebies to showcase their work. Look for designers who provide clear, tested instructions and respond to questions in the comments. Pattern repositories like AllFreeCrochet and LoveCrafts curate collections specifically for holidays, saving you search time.
Evaluating pattern quality before you start saves frustration. Check for completion photos from multiple angles, not just glamour shots. Read through comments and project notes where other crafters flag errors or confusing sections. Patterns with stitch counts at the end of each round signal careful editing. Beginner patterns typically use basic stitches, work in continuous rounds, and include fewer color changes, while advanced patterns incorporate complex shaping, multiple techniques, and detailed assembly.
Organize your finds immediately. Create a dedicated Pinterest board or digital folder, noting yarn requirements and estimated time for each pattern. Screenshot or download patterns rather than bookmarking, since free offerings sometimes disappear.
Understanding usage terms matters. Most free patterns allow you to sell finished items in small quantities but prohibit redistributing the pattern itself or mass production. When in doubt, check the designer’s terms or ask directly. Respecting these boundaries supports the crafters who generously share their work.
Step-by-Step: Completing Your Halloween Crochet Project
Reading and Understanding Your Pattern
Before diving into any Halloween pattern, take time to read through the entire instructions at least once. This preview helps you spot potential challenges and understand the project flow.
Most free patterns start with abbreviation lists. Common ones you’ll encounter include sc (single crochet), hdc (half double crochet), dc (double crochet), inc (increase), and dec (decrease). Keep a printed abbreviation guide nearby until these become second nature. Different countries use different terminology, so check whether your pattern uses US or UK conventions, as the same abbreviation can mean different stitches.
Gauge information appears near the beginning and tells you how many stitches and rows should fit in a measured square. While exact gauge matters less for decorative Halloween items than for wearables, it affects your project’s finished size. If the pattern shows a pumpkin should be 5 inches tall and yours measures 7 inches, your hook might be too large.
Print patterns whenever possible so you can highlight rows as you complete them. For digital viewing, use a tablet propped at eye level to reduce neck strain. Keep a small notebook nearby to track round numbers, color changes, and any modifications you make.
Starting Your Project: Foundation and First Rounds
Most Halloween crochet patterns start with either a magic ring (also called an adjustable ring) or a foundation chain. The magic ring works best for amigurumi pumpkins, ghosts, and round shapes because it creates a tight, seamless center with no visible hole. To make one, wrap yarn twice around your fingers, insert your hook to grab the working yarn, and pull through. Chain one, then work your first round of stitches into the ring. Before finishing the round, pull the tail end firmly to close the circle completely.
Foundation chains suit flat pieces like garlands, bookmarks, or wall hangings. Count your chains carefully since Halloween patterns often require specific widths. Many crocheters mark the last chain with a stitch marker to avoid confusion when turning for the first row.
Tension matters from stitch one. Gripping your hook too tightly creates stiff, small stitches that throw off your gauge. Hold it like a pencil or knife, whichever feels natural, and let the yarn flow smoothly through your fingers. Puckered or loose starting rounds ruin shaping later, especially on 3D pieces like jack-o-lanterns.
Count aloud as you complete each stitch. Place a marker in your first stitch so you know exactly where each round begins and ends. Recounting takes seconds but prevents hours of frustrating frogging.
Working Through the Main Body
Once you’re past the foundation, most Halloween patterns involve repeating sequences that build your project’s shape. Read through each round or row completely before starting, this prevents mid-round surprises. Use stitch markers at round beginnings or pattern repeat points. Moving the marker up as you work keeps you oriented, especially in spiral amigurumi where rounds blend together.
Color changes create dramatic Halloween effects. When switching yarns for stripes or details, carry the unused color along the inside of your work rather than cutting it constantly. This saves ends to weave later. For crisp color transitions, complete the last yarn-over of your final stitch with the new color. Loose yarn tails dangle inside where stuffing will hide them.
Tension consistency matters more than you’d think. Tight stitches create stiff, undersized projects; loose ones look sloppy and gap. If your work feels off, check that you’re not splitting yarn or skipping stitches accidentally. Recount every few rounds, catching a missed stitch early beats frogging six rounds later.
Lost your place? Count back to the last marker and compare stitch counts against the pattern. Most designers include stitch totals in brackets for exactly this reason. When stitches don’t match, it’s usually an increase or decrease worked incorrectly in the previous round.
Stuffing and Shaping (For Amigurumi Projects)
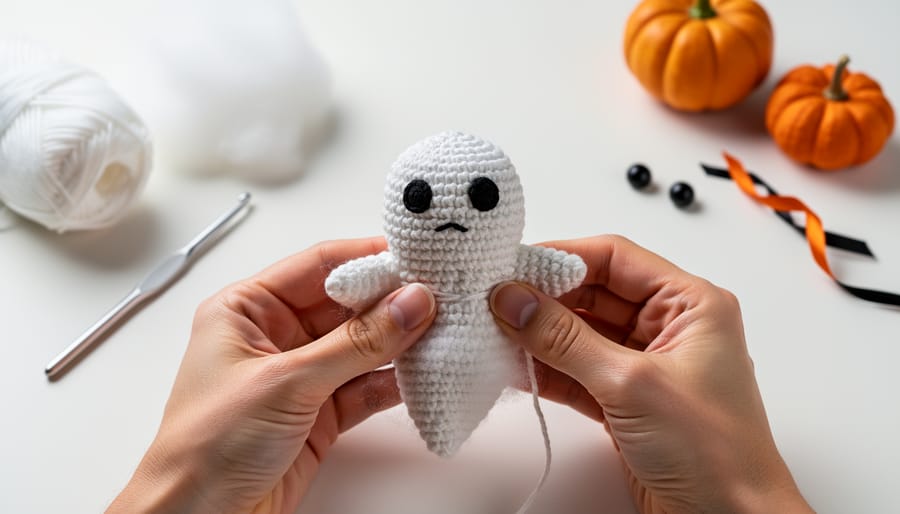
Start stuffing when your piece is about two-thirds complete, leaving the opening accessible for filling. Use small amounts of polyester fiberfill at a time, pushing it gently into corners and extremities with the blunt end of your hook or a chopstick. For pumpkins, stuff firmly around the perimeter first, then add vertical sections to emphasize ridges as you go. Ghosts benefit from lighter stuffing at the bottom third to create a floating effect, with firmer filling in the head area. Test firmness by squeezing, amigurumi should feel plush but hold its shape without collapsing or showing lumps through the fabric. If creating toys for young children, be aware of stuffed toy safety requirements regarding small parts and choking hazards. Never overstuff, as this distorts stitches and can split seams.
Adding Features and Finishing Touches
Adding the final details transforms your Halloween project from a collection of stitches into a character with personality. Start by positioning safety eyes before stuffing completely, you can adjust placement until you find the perfect expression. For pumpkins, space eyes slightly wider apart for a friendly look, or closer together for a mischievous grin. Press firmly until you hear the backing click securely into place.
If you’re creating decorations for young children, embroider eyes instead using black yarn and satin stitch. This technique also works beautifully for ghost faces and witch features. Thread a yarn needle with black or contrasting yarn, make small knots on the inside, and stitch French knots for eyes or backstitch for mouths and eyebrows.
- Attach all facial features and embellishments while checking symmetry from multiple angles
- Weave in loose yarn ends by threading them through several stitches on the wrong side, changing direction at least once
- Trim excess yarn close to the work, leaving about 1/4 inch to prevent unraveling
- Steam gently with an iron held above the piece (not touching) to blend in trimmed ends and smooth any puckering
- Add final touches like ribbon bows, felt accents, or small bells using fabric glue or stitching
For expressive details, experiment with eyebrow angles, arched brows create surprise, while angled-down inner corners add a sinister touch perfect for villains. Don’t rush this stage. Taking time to thoughtfully position each element makes the difference between a generic decoration and one that truly captures the Halloween spirit.
Popular Halloween Crochet Pattern Ideas for 2026
Crafters in 2026 are embracing both nostalgic classics and fresh takes on Halloween crochet, creating everything from traditional jack-o-lanterns to trendy kawaii-style characters. The beauty of free patterns lies in their variety, letting you choose projects that match your skill level and available crafting time while still achieving impressive results.
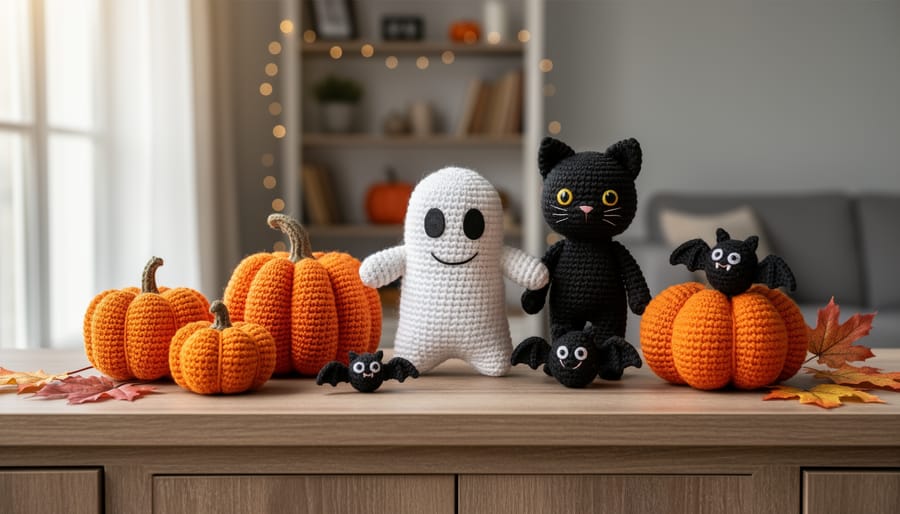
- Classic Pumpkins and Jack-o-Lanterns, These timeless favourites range from simple sphere designs (beginner-friendly) to more detailed varieties with ridged textures and carved faces, perfect for table displays or garland stringing
- Amigurumi Ghosts and Spirits, Adorable rounded ghosts with flowing “fabric” edges remain wildly popular because they work up quickly and look charming in groups, requiring only basic stitches (beginner to intermediate)
- Spooky Creatures Collection, Bats, spiders, black cats, and owls offer intermediate crocheters a chance to practice shaping techniques and add wire armatures for poseable wings or legs
- Witch Hats and Mini Accessories, Small wearable items or decorative witch hats with buckles and brims let beginners practice working in the round while creating functional décor that also works as photo props
- Halloween Garlands and Bunting, String-together projects combining skulls, candy corn, or mini pumpkins appeal to all skill levels and create impressive impact with repetitive, manageable motifs
- Modern Kawaii Characters, Cute versions of Frankenstein, mummies, and vampires with oversized heads and tiny bodies attract younger crafters and those preferring whimsical over frightening (intermediate)
- Functional Items with Flair, Coasters, basket covers, and treat bags featuring spiderweb patterns or Halloween colours blend practicality with seasonal charm, and some crafters even use a paper cutter for decor elements that complement their finished crochet pieces
The projects gaining the most traction combine reasonable completion times with visual impact, explaining why amigurumi sets and garland components dominate pattern downloads. Crafters particularly appreciate patterns that offer customisation options, letting them adjust colours or facial expressions to create unique pieces that reflect their personal Halloween aesthetic rather than producing identical copies.
Checking Your Work and Final Quality Checks
Before declaring your Halloween crochet project complete, examine it methodically to catch issues that might affect durability or appearance. Hold your finished piece next to the pattern photo and verify that proportions, color placement, and overall shape match the designer’s intent. Check each seam by gently tugging to ensure your whipstitches or mattress stitches hold firm. Flip the project inside out and confirm every yarn tail is woven through at least three stitches and trimmed close to prevent unraveling.
For amigurumi, squeeze gently to test stuffing distribution. Lumpy areas or visible gaps signal the need for adjustment. Tug on attached features like safety eyes, button noses, or embroidered mouths to verify they’re secure, especially if children will handle your creation. If your pumpkin looks misshapen or your ghost has puckered edges, light blocking with a handheld steamer held several inches away can smooth stitches without flattening texture.
Photograph your completed work from multiple angles in good natural light, then compare these images to the pattern reference. This distance perspective reveals asymmetries you might miss up close. When satisfied with quality, capture additional photos to store photos safely as a record of your crafting accomplishment.
Expert Tips for Halloween Crochet Success
Starting early makes all the difference with seasonal crochet projects. Give yourself at least six to eight weeks before Halloween to work through your list comfortably, especially if you’re creating multiple decorations or gifts. Working in short daily sessions of 30 to 45 minutes prevents hand fatigue and keeps the hobby enjoyable rather than stressful. Many experienced crocheters choose August as their Halloween kick-off month, leaving plenty of buffer time for do-overs or adding extra projects.
When substituting yarn, match the weight category rather than the brand. A pattern calling for worsted weight will work with any #4 yarn, though texture and drape might vary slightly. Buy an extra ball when substituting since yardage differs between brands. Test your gauge with the new yarn and adjust hook size if needed to match the pattern’s dimensions.
Adapt patterns to your comfort zone by simplifying ambitious projects or challenging yourself with easier ones. If a pattern feels too complex, look for similar designs with fewer colour changes or simpler stitch combinations that complement your current beginner craft supplies and skill set. Conversely, experienced crocheters can add interest to basic patterns through textured stitches, size variations, or creative embellishments.
Store finished Halloween pieces in clear bins with labels noting contents and any assembly instructions for next year. Loosely stuff amigurumi with tissue paper to help them hold their shape during storage. Display your completed projects on mantels, shelves, or hung from doorways using clear fishing line for a floating effect. Group similar items together, a collection of small pumpkins or a family of ghosts, for greater visual impact.
Common Questions About Free Halloween Crochet Patterns
Are free Halloween crochet patterns suitable for beginners?
Many free patterns include skill level indicators, with plenty designed specifically for beginners using basic stitches like single crochet and simple increases. Look for patterns labeled “easy” or “beginner-friendly” and start with simpler shapes like flat pumpkins or basic ghosts before attempting complex amigurumi.
How much yarn do I need for a typical Halloween crochet project?
Most small Halloween decorations require 50-100 grams of yarn, while larger projects like blankets or costumes need 300-500 grams. Check the pattern’s materials list for specific yardage requirements, and consider buying an extra skein of your main color to avoid running short mid-project.
Can I sell items made from free crochet patterns?
This depends entirely on the designer’s copyright terms, which should be stated in the pattern. Some designers allow selling finished items with credit, others permit sales but prohibit mass production, and some restrict commercial use entirely, so always read the usage terms before selling your work.
What if I want to change the colors or size of a pattern?
Color changes are usually fine and won’t affect the construction, but size changes require adjusting your hook size or yarn weight. Going up one hook size and using heavier yarn makes projects larger, while smaller hooks and finer yarn create miniature versions.
When troubleshooting Halloween patterns, remember that tension issues cause most sizing problems. If your pumpkin seems too floppy or your ghost too tight, adjust your hook size rather than fighting your natural tension. Color pooling can create unintentional patterns in variegated Halloween yarns, so work a swatch first to see how colors distribute.
Missing stitches in facial features happen frequently when you’re tired or distracted. Count your stitches at the end of each round for amigurumi projects, especially before stuffing makes recounting impossible. For decorative items like garlands or appliques, blocking helps even out any wonky stitches and gives a more polished finish.
If you’re documenting your Halloween projects for personal records or sharing on social media, techniques from archival paper tips can help preserve printed patterns and project notes alongside photos of your finished creations. Many crocheters find that substituting similar-weight yarns works fine for Halloween projects since exact color matches matter less with seasonal decorations. Just verify your gauge matches the pattern’s specifications before committing to a full project.
Quick Reference: Key Takeaways
Keep these essentials in mind as you work on your Halloween crochet projects. Start with medium-weight yarn (worsted or DK) and appropriate hook sizes listed in your chosen pattern. For amigurumi, you’ll need stuffing material and safety eyes or child-safe embroidered alternatives if crafting for young children.
Safety first: secure all small parts firmly, weave in ends completely, and consider age-appropriateness when gifting or displaying your creations. Source patterns from established designers and pattern sites where you can read reviews and see finished project photos.
Follow the process systematically: read your entire pattern before starting, maintain consistent tension throughout, count your stitches regularly, and add stuffing gradually for even shaping. Take breaks to prevent hand strain, especially during marathon crafting sessions.
Remember that Halloween crochet improves with practice. Start with simpler patterns like pumpkins or ghosts before attempting complex characters. Keep this reference handy when you need a quick reminder mid-project, and don’t hesitate to consult the detailed sections above for specific guidance on materials, techniques, or troubleshooting.
You’ve got everything you need to create charming Halloween decorations that’ll make your space uniquely yours. Whether you’re stitching your first tiny pumpkin or tackling an ambitious amigurumi ghost, remember that every crocheter started exactly where you are now. The beauty of working with free patterns is that you can experiment, learn, and grow your skills without pressure.
Don’t hesitate to start small if you’re new to this. A simple coaster or garland can build your confidence while creating something genuinely useful. And if you hit a snag? That’s part of the process. The crafting community is incredibly welcoming, and most pattern designers are happy to help troubleshooters in the comments.
Your handmade Halloween pieces carry something store-bought decorations never can: the warmth of time spent creating, the personality of your color choices, and the satisfaction of saying “I made that.” They’ll spark conversations, delight trick-or-treaters, and become treasured parts of your seasonal traditions.
Ready to keep crafting? Our site has hundreds more tutorials covering everything from beginner techniques to advanced projects. Each season brings new opportunities to create something wonderful. Grab your hook and let’s make this Halloween unforgettably handmade.